Virtual Tour Editor
Virtual Tour Editor: The VirtualTourEditor.exe is an easy to
use GUI based virtual
tour authoring tool included with PMVR.
Multi-Platform: Although the VirtualTourEditor itself is a Windows EXE,
it produces virtual tours that can be viewed on any platform.
Running: After downloading and installing
PMVR, run the Virtual Tour Editor via the link on your desktop, or via 'Start /
All Programs / PMVR / VirtualTourEditor'.
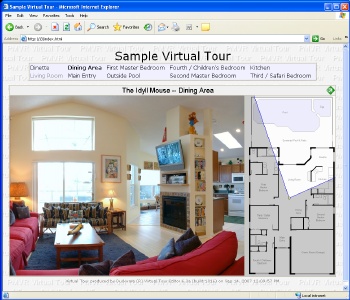
Sample Virtual Tour: In the PMVR download, there is a 'Sample Virtual Tour'
folder for a script.txt file that can be opened by the Virtual Tour
Editor. Open the script and give the tour editor a try.
|
2. Getting Started - steps for creating a new virtual tour
|
|
The basic steps for producing a virtual tour are as follows. Scroll
down this web page for more details on each step.
Create High Resolution Panoramas: Use
stitching software
to create high resolution panoramas. Visit
www.panohelp.com
for help, tips, and articles.
Create a New Tour: In the Virtual Tour Editor, go to
File / New Virtual Tour, create a new folder in 'My Documents',
and name your script file, typically always script.txt.
View details.
Configure Tour Properties: Decide upon the pixel height of your
web tour -- 500 pixels to 1000 pixels high is a good size -- and configure
within the tour Properties dialog.
View details.
New Nodes / Import Panoramas: Click on the "New..." button next
to the 'Nodes' button. Each 'node' in the tour is essentially a panorama.
Import your high resolution panorama into the tour editor (which will
resize the panorama, as needed). Optionally select (or add) an Map image.
Repeat for as many panoramas there are in your virtual tour.
Add Hot Spots: Add hot spots, which allows and end user to nagivate from
panorama to panorama in your tour.
View details.
Preview the Tour: Preview your tour by clicking on the 'Preview'
button.
View details.
Publish the Tour: Click on the Publish button and select the
publish method (trial server, web server, zip file, temp folder, etc).
View details.
For reference, here are the VirtualTourEditor menues and tour action buttons:
|
4. Creating a New Virtual Tour
|
|
Go to 'File / New Virtual Tour...' and you will see a dialog similar to:
Just enter a nice descriptive folder name for your tour and press OK.
The Vitual Tour Editor will then automatically bring up the
tour properties dialog (publish tab).
After clicking OK, the
Virtual Tour Editor will then automatically bring up the
New Panorama Node dialog.
|
5. Tour Properties Dialog
|
|
Options Tab:
Colors Tab:
Publish Tab:
Template Tab:

|
6. Adding a new Panorama Node
|
|
Click on the 'New...' button next to the 'Nodes:' Label to create a new panorama node. You will
see a dialog like the following. Follow these steps:
- Name the panorama node. This is an internal (not public) name
- Select a panorama image for this node. Use the 'Import...' button to import
panoramas that you have created (using image stitching
software) into the virtual tour project.
- Optionally, select a map/floorplan for your panorama. New Map Dialog
When you press the 'Import...' button in the New Panorama Dialog
you will first be presented with an 'open file' dialog. Find a high quality high
resolution original panorama on your hard drive and select / double click on the file.
You will then see this import dialog:
You typically want a pixel height larger than the viewer window because
you want zooming in to initially reveal more detail. The JPEG quality
setting is a percentage. We recommend '97 Fine' quality to avoid JPEG
jaggies / artifacts.
When done, press OK. You high res pano will be resized and saved in
the tour folder, images sub folder.
|
8. Adding a new Map/Floorplan node
|
|
Usually maps are added via the 'New Panorama' dialog box by clicking
on the "New..." button, but they can also be created (and selected) via the Map menu. Use the
'Import..." button to add a map/floorplan image into the virtual tour project.
You can add as many maps as you want to a virtual tour. Most often, several panoramas
share a map/floorplan node.
|
9. Panorama Map Position/Angle
|
|
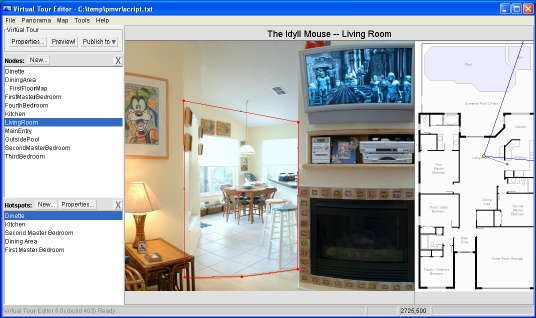
The yellow dot in the floorplan represents the panorama camera position. Click
and drag to move the position. The blue lines represent the current 'field of
view' of the panorama. The width of the panorama viewer window determines the
angle of these lines. However, you must point them in the correct direction, which
is the reason for the gray control point. Just click and drag to rotate as needed.
TIP: Drag the panorama image until a corner of a room is leftmost (or rightmost)
inside the viewer window. Then, click and drag on the gray turning dot until the left
(or right) blue line on the map crosses the room corner (on the map). Please note that this will
only work if you have first moved the yellow dot to the panorama picture taking position
on the map.
|
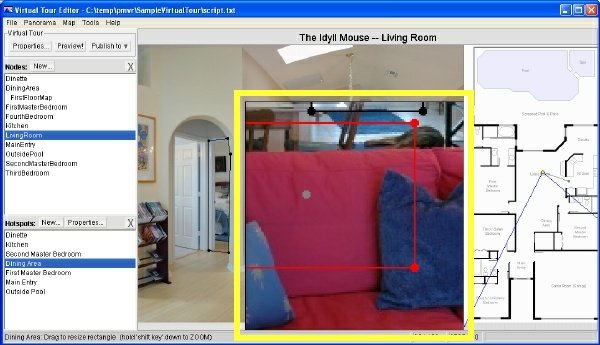
10. Adding Hotspots to Panoramas and Maps
|
|
Active Node: First, select the node (panorama node or map node) from the nodes
list that you want to add a hotspot to. The panorama (or map) will then appear in the
left side of the Virtual Tour Editor, where hotspot editing takes place.
New Hotspot: Hot spots can either be added by (1) clicking on the "New..." button
next to the 'Hotspots' text label or (2) by right clicking inside the panorama and
selecting 'New Hotspot' from the context menu.
This popup menu also has other nice hot spot shortcuts:
TIP: Drag a polygon line 'mid point' to create a new polygon control point. To delete
a polygon control point, drag it over an adjacent control point.
TIP: To edit/change an existing hotspot, click on the spot (to change the focus to the hotspot),
then right-click to obtain the hotspot context menu.
When you are clicking/editing/moving/etc a hotspot, to magnify the
edit area, activate ZOOM mode by holding down the SHIFT key:
|
12. Panorama Center Location
|
|
 When the PMVR viewer first diplays a panorama, in what direction
does it present the panorama? That is what the 'center' indicator
is for.
When the PMVR viewer first diplays a panorama, in what direction
does it present the panorama? That is what the 'center' indicator
is for.
To change the initial viewing direction for a panorama, click
and drag the 'center'ing triangle that you see just below the
panorama.
When PMVR first displays a panorama, this triangle will automatically
be centered within the viewer window.
Web Browser: The quickest way to see what your virtual tour will look
like in a web browser is to click the 'Preview!' button, which will launch
your tour in a web browser (connects to a mini web server build into the
Virtual Tour Editor):

Another Way: The Virtual Tour Editor tries to work around any
preview failures (due to personal firewalls, etc), so if the preview fails,
just publish to the Duckware Trial Web Server (next section),
or publish to a temp folder and open the index.html to preview your tour.
Click on the 'Publish to' button to obtain publish options. The
quickest way to see your virtual tour on a web server is to select the 'Duckware Trial Web Server'
option. To automatically publish the tour to your web server, select the 'Web Server via FTP'
option.
TIP: To automatically customize the default index.html created by the Virtual Tour Editor,
review how Templates work.
TIP: To manually customize the index.html, take the
index.html created by the Virtual Tour Editor and modify it to your
look/feel needs. Then, when you publish the tour again, overwrite the
index.html with your customized version. This generally work well
only after you have defined all of the nodes in a tour.
|
15. Customizing HTML look/feel
|
|
The index.html HTML file that this VirtualTourEditor produces can be
fully edited and changed by you to create any look/feel that you want.
And this method works well for 'one off' tours. Produce the tour, publish to a zip
file, modify the index.html file, and provide the ZIP to your client.
However, if you are going to be producing a lot of virtual tours with the same
look/feel, you can add a template file into the
tour editor.
|