PMVRTM - Patented Mappable VR
PMVR is an HTML5 panorama viewer, that displays high resolution panoramas,
with an optional integrated map/floorplan feature, on web sites, demo CDs, Kiosks, etc:
No plugin / Runs everywhere: There is NO PLUGIN. PMVR is HTML5 based, which means that it
works in ALL modern web browsers — on smartphones, tablets, computers (Windows, OSX, Unix, etc).
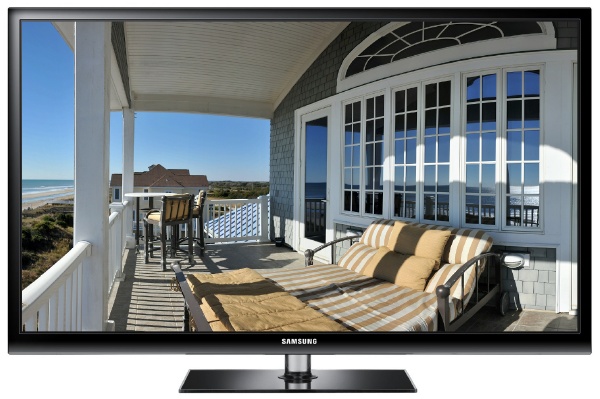
PMVR Full Screen mode on an HDTV monitor
|
FAST / Fullscreen PMVR uses the GPU (Graphics Processing Unit) on your device to ensure high-quality and
smooth graphics, and enables full-screen capabilities (example seen right on a 1080p HD monitor).
Patented Technology:
PMVR is a unique panoramic viewer, displaying an optional FloorPlan/Map.
which greatly enhances a viewers ability to walk through a 'mappable' environment
and understand 'direction'. See US Patent #6563529.
Tour Authoring Software:
PMVR comes with the Virtual Tour Editor
authoring tool, which takes care of all the hard work for you. Or, simply give your
web developer the pmvr.js file and give them the freedom to create
a unique tour experience.
Large Panorama Support: Very large panoramas are
supported.
Examples: Click on one of the following images to view a virtual tour that uses PMVR:
|
TIP: Run the VirtualTourEditor.exe
virtual tour authoring tool
(in the trial download) to quickly create professional virtual tours with
multiple nodes and floorplan/map images -- all with hotspots.
|
|
Quick Start 1: Display a panorama:
Do you already have a panorama to display? If not,
we have some tips to get you started.
Or use download and use
sample image (saving it to your
hard disk drive).
When you have a panorama to display, place it into a
directory with an HTML file (that you create yourself, or by using an
HTML editor) and add the following HTML code into the body of the document:
<div id="pmvr" style="width:800px;height:600px">
<param name="image" value="yourpanorama.jpg">
<param name="view" value="360">
</div>
|
|
Next, add some Javascript into your web page to bind
PMVR (to the div id)
when your web page loads, similar to:
|
<body onload="PMVR.bindto('pmvr')">
|
|
Finally, place the pmvr.js file (from the PMVR download/installation)
into this same directory, load it at the top of your web page,
and you are done! View your HTML file to
view your panorama.
View quickstart1.html Live Example
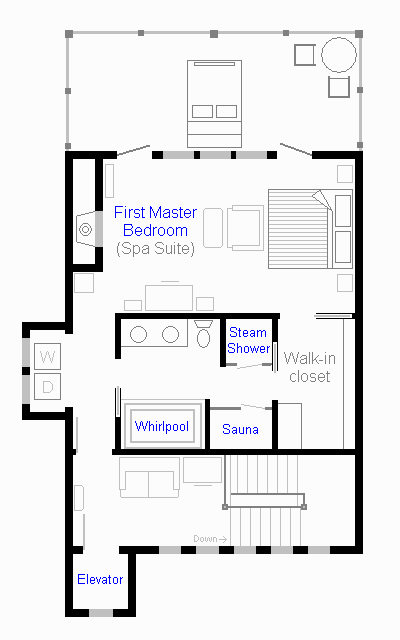
Quick Start 2: Add a map/floorplan: If you do not have a floorplan or map image,
just use this sample floorplan, saving
it to your hard disk drive. Then add this into your HTML document, where X, Y
is the camera location on the map:
<div id="FloorPlan" style="width:400px;height:600px">
<param name="image" value="floorplan.gif">
<param name="x" value="141">
<param name="y" value="46">
</div>
|
|
Next, add the FloorPlan div id into the PMVR bindto call:
PMVR.bindto('pmvr','FloorPlan')
|
|
And finally instruct
PMVR to interact with the FloorPlan, by adding a pixdeg param into the
pmvr div tag -- which describes panorama pixel width and compass direction:
<param name="pixdeg" value="0=270,6164=270">
|
|
View quickstart2.html Live Example
Quick Start 3: Add a title bar with 'fullscreen' icon: First, add a new div
into your HTML:
and bind the div id to PMVR:
PMVR.bindto('pmvr','FloorPlan','Label')
|
|
View quickstart3.html Live Example
Script Files: Because placing param's into HTML quickly becomes unwieldy
when creating multi-node tours, all of the params for an entire scene are typically moved
into a single script (text) file section, and replaced by a single param reference:
|
<param name="script" value="script.txt:init">
|
|
Syntax: Script files are UTF-8 text files composed of [sections], where each
line in a section sets a PMVR parameter value using a divid.key=value syntax.
For example:
[init]
pmvr.script=$THIS:LivingRoom
[LivingRoom]
Label.txt=Living Room
pmvr.image=images/livingroom.jpg
[Kitchen]
Label.txt=Kitchen
pmvr.image=images/kitchen.jpg
|
|
Example: View the script.txt file for the
PMVR scene running at the top of this web page.
|
4. Controlling PMVR via Javascript
|
|
When you bind PMVR to a series of div ids in a webpage via PMVR.bindto(pmvr-divid, floorplan-divid, label-divid),
an interface to control that part of PMVR is exposed via a new document.divid object.
For example, if you have a PMVR tour, and you name the div ids the standard "pmvr",
"FloorPlan", and "Label", that will cause the following interfaces to be exposed:
document.pmvr.set(key,value)
document.FloorPlan.set(key,value)
document.Label.set(key,value)
|
|
The 'key' is any parameter name, and 'value' is what to set the parameter to. For example,
if you want to script the ability to go into full screen mode, you would do this
(from an 'onclick'):
This interface is intentionally identical to the prior version of PMVR (based upon Java applets),
so that virtually all prior scripting code will also work with the new HTML5 version
of PMVR.
pmvrEventHook():
If there is a function inside the webpage called pmvrEventHook, defined as follows:
function pmvrEventHook(action,arg,applet) {
...
}
|
|
PMVR will call that function to notify the web page of significant PMVR events:
| action | arg |
| node |
User navigated to a new node / script section (arg is a String name)
|
| preload |
The panorama for the given node / script section was preloaded (arg is a String name)
|
| vpi |
Viewport information, where arg is an object containing numbers lpix, rpix, tpix, bpix,
iw, ih, ldeg, rdeg, and z.
|
The
Virtual Tour Editor uses this event hook
to create links on a web page that gray and bold as you navigate through a tour.
This callback can be used to synchronize the viewports of two panoramas to a
single floorplan.
|
TIP: The
Virtual Tour Editor
will automatically configure and set most of these parameters for you. This
entire section is provided for advanced users who want to
manually customize their tours.
|
| PMVR Parameters |
| name | value | Description |
| script | scriptref |
Runs all commands within a given script [section]
— the preferred way to set all parameters for a scene
|
| image | URL |
A relative URL to a panoramic image (JPG) to display. Optional "#WxH' appended
specifies original image width/height (allows you to drop in a high quality JPG
into a tour without changing any scripts).
|
| view | Integer |
The panoramic image width, in degrees (1-360). Must set to 360 for a full 360 panorama.
Defaults to non-360 value.
|
| auto | Integer |
Horizontal auto scroll one pixel every specified number of milliseconds (default 1/60 second).
The sign (positive/negative) of this value indicates direction. Positive moves camera right.
Negative moves camera left.
|
| center | Integer |
Whenever a panorama is first viewed, this pixel location is centered within
the viewport. Defaults to 0.
|
| vcenter | Integer |
Whenever a panorama is first viewed, this vertical pixel location is centered
within the viewport.
|
| pixdeg | pixdeg-spec |
Defines which direction a panorama is facing. See pixdeg-spec for details.
|
| delay | Integer |
Delay in milliseconds before auto scrolling restarts (default: 30000)
|
| links | scriptref |
Defines hot spots. Points to a script [section], where each line in the script
section is a link-spec
|
| spot | URL |
A relative URL to a image (usually a transparent GIF), which overlays all hot spots.
|
| fullscreen | yes/no |
May only be set via javascript scripting as part of a onclick handler. Causes the viewer
to go into full screen mode.
|
| hover | yes/no |
Hilight hotspot when mouse hovers over it (default: yes)
|
| arrows | yes/no |
Displays arrows when panorama is dragged (default: yes)
|
| background | color |
Background color (default gray: F0F0F0)
|
| foreground | color |
Foreground / text color (default black: 000000)
|
| cHelp | color |
background color of popup hotspot labels (default white: FFFFFF)
|
| cZoom | color |
Inside color of zoom slider dot (default: 40FF40)
|
| cSlider | color |
Inside color of zoom slider (default white: FFFFFF)
|
| zMin | Integer |
Minimum zoom, as a percentage value. Defaults to 10 (10%).
|
| zMax | Integer |
Maximum zoom, as a percentage value. Defaults to 400 (400%).
|
| z | Integer |
sets current zoom factor. For scripting.
|
| FloorPlan Parameters |
| name | value | Description |
| script | scriptref |
Runs all commands within a given script [section]
— the preferred way to set all parameters for a scene
|
| image | URL |
A relative URL to a floorplan/map image (GIF/JPG/etc) to display
|
| x | Integer |
The X (horizontal) pixel location on the map where hilight arc is centered
|
| y | Integer |
The Y (vertical) pixel location on the map where hilight arc is centered
|
| links | scriptref |
Defines hot spots. Points to a script [section], where each line in the script
section is a link-spec
|
| gray | Integer |
Opacity (0-100) of the non-hilight arc (default: 20). A negative value will
gray the hilight arc.
|
| hover | yes/no |
Hilight hotspot when mouse hovers over it (default: yes)
|
| background | color |
Background color (default gray: F0F0F0)
|
| foreground | color |
Foreground / text color (default black: 000000)
|
| cHelp | color |
background color of popup hotspot labels (default white: FFFFFF)
|
| cGray | color |
The color of the hilight arc (default black: 000000)
|
| Label / Title Bar Parameters |
| name | value | Description |
| text | String |
Text displayed
|
| fsimage | URL |
A relative URL to a 'go full screen' icon to use. The default is an internally generated icon
with four arrows pointing at the corners.
|
scriptref: is a "filename{:section}",
where the filename is a relative URL, followed by a ":section"
within the script (is missing, defaults it "init").
link-spec: is a
"pts=num-list
TAB href=url-target
TAB desc=description
{TAB spot=image}"
where 'num-list' specifies the type of region (rectangle, circle, etc --
see num-list below),
'url-target' is the URL to launch when the user clicks in
the link region (or Scripting action, see
url-target
below), and 'description' is the human
readable description that is displayed when the user moves the mouse over
the region, and 'spot' is the URL to a spot image (usually always a small transparent GIF).
url-target: A URL (absolute or relative) followed by an
optional " in target", where target is _blank, _parent, _self, _top,
your own name, a window name, a frame name, or an iframe name. Or "javascript:"
followed by JavaScript code. However, please note that the JavaScript
code must not contain any commas (which are used by the
link-spec). This is usually not a problem since
you can just call a JavaScript function that you have written within the
web page, which can contain commas. Refer to the
Scripting [§6] section for details (especially
the section on MAYSCRIPT). A relative URL is relative to the HTML document
URL. Sometimes you just want to create a hot spot that annotates the image.
In this case, set the url-target to "-" (a comment -- do nothing).
For example, here are some url-targets:
| Type | url-target Syntax | Example |
| relative | filename | kitchen.html |
| absolute | URL | http://www.xyz.com |
| target | URL in name | http://www.duckware.com in _top |
| javascript | javascript:code | javascript:alert('Clicked!') |
| variable | set:{divid.}parameter=value | set:pmvr.view=180 |
| script | set:{divid.}script=scriptref | set:script=script.txt:gotoKitchen |
| comment | - | - |
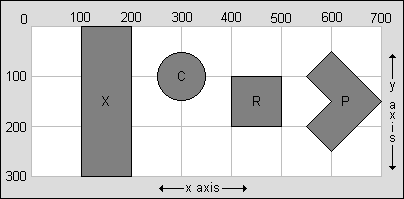
num-list: The number list varies in size depending upon what
hot spot region you want to create.
For a simple x-axis section (all y pixels), use two numbers, as is "left,right".
For a circle, use three numbers, as in "x-center,y-center,radius".
For a rectangle, use four numbers, as in "left,top,right,bottom".
For a polygon, use multiple x,y pairs, as in "x1,y1,x2,y2,....,xn,yn".
In summary:
| Region Type | num-list specification | Sample num-list | area below |
| x-axis section | left,right | 100,200 | X |
| circle | x-center,y-center,radius | 300,100,50 | C |
| rectangle | left,top,right,bottom | 400,100,500,200 | R |
| polygon | x1,y1,x2,y2,....,xn,yn | 600,50,700,150,600,250,
550,200,600,150,550,100 | P |
pixdeg-spec: A list of 'pixel=degree' -- that identifies the
direction (degree) you are looking at various pixel locations. At a minimum, the
first and last pixel/degree need to be specified. More are needed only
if the panoramic is not a perfect panoramic.
color: A color specified in 'RRGGBB' (red/green/blue) hexadecimal
format. For example, 'FF0000' is pure red, '00FF00' is pure green, '0000FF'
is pure blue, 'FFFFFF' is white, '000000' is black, 'CCCCCC' is light gray,
etc. Please refer to
http://www.utexas.edu/learn/html/colors.html
for a list of sample colors along with 'RRGGBB' values.
Within PMVR, 'A' and 'Z' will zoom in and out, and arrow keys move the panorama around (holding shift down will
move by one pixel).
Javascrpt Console:
Before deploying a PMVR virtual tour, test in various web browsers, and on the desktop, in
Microsoft Internet Explorer / Edge, and Google Chrome, press F12 and review the Javascript
console for any error messages.
|
8. Converting PMVR HTML from Java Applets to HTML5
|
|
To convert your HTML from a prior version of PMVR (which used Java applets)
to the new version (which uses HTML5), follow these steps:
- Add a script tag into the HTML head and include the new pmvr.js.
- When your web page loads (hook into onload of the body tag),
call PMVR.bindto("pmvr","FloorPlan","Label") (if you don't use FloorPlan or Label, set
those arguments to null).
- Change applet begin/end tags to div begin/end tags and
change each tag's name="..." attribute to id="..." (NOTE: do not change the 'name' in 'param' tags!)
- Remove all other attributes (note: not 'param' tags) from the old applet tags,
changing width=# and height=# attributes to CSS: style="width:#;height:#"
- Verify when changing scenes, that appropriate parameters are fully set (like PMVR's 'view' to
180 or 360, etc).
|
9. No Nonsense License Agreement
|
|
PMVR is shareware. That means that you may try it for free to see if it works for you.
If you like the software enough to keep using it, you must pay for it. The unregistered
version of PMVR is for evaluation purposes only and may not be used on real-world servers.
If you find anything wrong with the software, let me know and I will try to fix the problem
immediately. My entire liability for your use of this software shall not exceed the
amount you paid for the software. You may not reverse engineer or decompile the software.
You may not modify the software in any way. The software may not be used on adult
sites nor to display adult material. License violations will result in license
termination, forfeiture of license fees, and possible prosecution.
|


